
Email format error
Email cannot be empty
Email already exists
6-20 characters(letters plus numbers only)
The password is inconsistent
Email format error
Email cannot be empty
Email does not exist
6-20 characters(letters plus numbers only)
The password is inconsistent


News
How to Replace the Strut Assembly Front on a 2011 Nissan Versa: A Step-by-Step Guide
If you're a Nissan Versa owner or a car enthusiast looking to replace the strut assembly front on a 2011 Nissan Versa, you've come to the right place. This task may seem daunting at first, but with the proper tools, knowledge, and a little patience, you can replace the front strut assembly yourself. In this blog, we'll break down the entire process step-by-step, offering valuable tips to ensure a successful replacement while also helping you save money on labor costs.
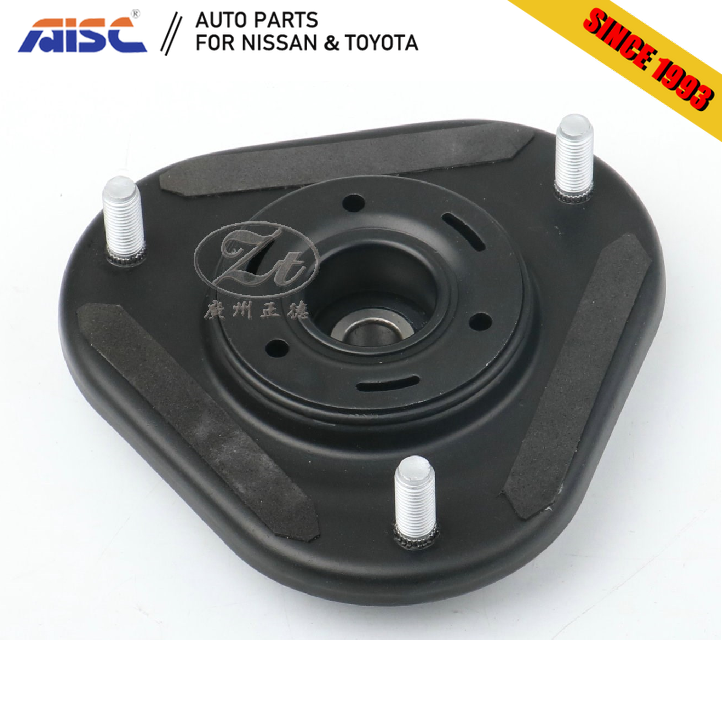
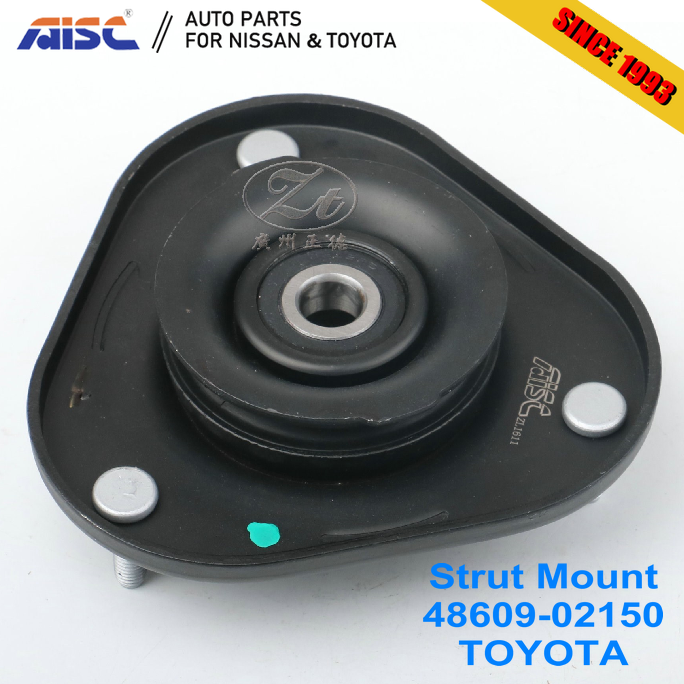
What is a Strut Assembly?
Before we dive into the procedure for replacing the strut assembly front on a 2011 Nissan Versa, it’s essential to understand what a strut assembly is and why it plays a crucial role in your car’s suspension system.
A strut assembly consists of a coil spring, strut, and shock absorber. It’s part of the vehicle's suspension system, which is responsible for absorbing shocks and vibrations from the road. Over time, strut assemblies can wear out, leading to handling issues, uneven tire wear, and a bumpy ride. If you’re noticing any of these signs on your 2011 Nissan Versa, it might be time to replace the front strut assembly.
Signs That You Need to Replace the Strut Assembly Front on a 2011 Nissan Versa
Before proceeding with the replacement, you should confirm that the front strut assembly is indeed the issue. Here are some common signs that it might be time for a replacement:
-
Unusual Noises: If you hear knocking or rattling noises while driving, especially over bumps, it could indicate that the strut assembly is failing.
-
Uneven Tire Wear: Struts are responsible for keeping your tires in proper contact with the road. Worn struts can cause uneven tire wear, which is a clear indication that they need to be replaced.
-
Poor Handling: If your vehicle feels bouncy, unstable, or you notice excessive body roll while turning or braking, it’s likely that the strut assembly is damaged.
-
Leaking Fluid: If you spot fluid leaking from the strut assembly, it’s another strong sign that it needs to be replaced.
Tools and Materials You Will Need
To replace the strut assembly front on a 2011 Nissan Versa, you’ll need the following tools and materials:
- A jack and jack stands
- Socket set (including a torque wrench)
- Spring compressors
- Pry bar
- Impact wrench (optional but helpful)
- New strut assembly front (make sure it’s compatible with the 2011 Nissan Versa)
- Anti-seize lubricant
- Wheel chocks
Step-by-Step Guide to Replacing the Strut Assembly Front on a 2011 Nissan Versa
Step 1: Safety First
Before you begin, safety is of utmost importance. Ensure that the vehicle is parked on a flat, level surface. Use wheel chocks on the rear wheels to prevent any unwanted movement while working on the front strut assembly.
Step 2: Lift the Front of the Vehicle
Use a jack to lift the front of the 2011 Nissan Versa. Once it’s lifted, place jack stands underneath the vehicle to provide extra stability. Make sure the vehicle is securely supported before you begin working on it.
Step 3: Remove the Front Wheels
Using your socket set, remove the lug nuts securing the front wheels. Once the wheels are off, set them aside in a safe place. This will give you access to the strut assembly and suspension components.
Step 4: Locate the Strut Assembly
Now that you have access to the suspension area, locate the strut assembly. The strut assembly front on a 2011 Nissan Versa is mounted to the steering knuckle and the vehicle's body. You’ll see bolts connecting it to both components.
Step 5: Remove the Strut Mounting Bolts
Using your socket set, begin by removing the bolts securing the strut assembly to the steering knuckle. This may require an impact wrench if the bolts are particularly tight. Once the bolts are removed, the strut should be loose but still connected at the top.
Step 6: Detach the Top Mounting Bolts
Next, you’ll need to access the top of the strut assembly. This is usually located inside the engine bay, near the fender area. Remove any covers or panels obstructing the strut top mount. Then, use a socket set to remove the mounting bolts at the top of the strut assembly.
Step 7: Remove the Strut Assembly
With the bolts removed, carefully pull the strut assembly away from the suspension. This may require some wiggling, especially if the strut is still attached to the coil spring. You’ll want to be careful at this point to avoid any damage to the surrounding components.
Step 8: Compress the Coil Spring
Before you can remove the coil spring from the strut assembly, you’ll need to use spring compressors to safely compress the spring. This step is critical because the spring is under tension, and if handled improperly, it could cause injury. Once the spring is safely compressed, you can remove it from the strut.
Step 9: Install the New Strut Assembly
Now that the old strut assembly is removed, it’s time to install the new one. Begin by carefully placing the coil spring onto the new strut assembly and ensuring it is seated properly. Use the spring compressors again to ensure the spring is compressed tightly before proceeding.
Step 10: Attach the New Strut Assembly
Carefully insert the new strut assembly into place. First, attach the top mounting bolts inside the engine bay, making sure they’re securely tightened. Then, reattach the strut to the steering knuckle, using the previously removed bolts. Torque all bolts to the manufacturer’s specifications to ensure a secure fit.
Step 11: Reinstall the Wheels
Once the new strut assembly is securely in place, it’s time to reattach the front wheels. Carefully position the wheels back onto the wheel hub, and then hand-tighten the lug nuts. Lower the car to the ground and then tighten the lug nuts to the correct torque using your socket set.
Step 12: Test the Suspension
After you’ve finished the installation, it’s important to test the suspension. Take the 2011 Nissan Versa for a short test drive to ensure that the vehicle is handling properly. Listen for any unusual noises and check for smooth handling. If everything feels good, you’ve successfully replaced the strut assembly front on your 2011 Nissan Versa!
Conclusion
Replacing the strut assembly front on a 2011 Nissan Versa is a manageable task for those with the right tools and a little experience working on cars. By following this detailed step-by-step guide, you can save on costly labor fees and restore the handling and performance of your vehicle. Remember to take your time, be cautious when handling the spring, and ensure all components are securely tightened. If you feel unsure about any of the steps, don’t hesitate to seek professional help.
In conclusion, replacing the strut assembly front on a 2011 Nissan Versa is a rewarding DIY job that can improve your car’s suspension system and driving experience. Whether you're an experienced mechanic or a DIY novice, this guide will help you complete the job with confidence.
Make sure to replace your strut assembly front on a 2011 Nissan Versa regularly to ensure your car continues to run smoothly and safely on the road.